
Liriope’s Muse: Tree Care Tips from a Master Arborist
TRUSTED TREE CARE SERVICES SINCE 1970
Liriope's Muse: A Certified Arborist’s Guide to Hanging a Tree Swing
The temperatures are rising and it is the perfect time to put that swing up in the backyard tree that you’ve been telling yourself you’d do for years. Whether it is a fun swing for your children or one you can swing on in the quiet of the morning with a coffee, adding a swing to your backyard can completely transform it. I speak from experience!
I recently acquired a swing, for my daughter, and held onto it for nearly a month before I decided to finally hang it up in the Bald Cypress tree in the center of my backyard. And let me tell you, it changed everything for me and my little family. We went from spending no time in our backyard hardly at all, to now we are out there for at least an hour(oftentimes, many hours) each day! I would’ve never guessed something as simple as adding a swing would get us out and, in the sun, as much as it has!
If there’s one thing you take from this blog, its to get a swing! Whether it's a play swing, a DIY swing (ideas at the end of the blog), or a wooden chair swing for two, I say now is the time to go for it! In this blog, I will go into depth on how to choose the right branch and install the right hardware to ensure the tree's health and the swing's longevity in your backyard for many years to come!
Is my tree a good candidate for a tree swing?
Trees are much stronger than we give them credit for! So, there are many trees that make a good candidate to host a swing. What you are mainly looking for is a healthy, mature, and established hardwood tree that is capable of supporting large lateral limbs without defects.
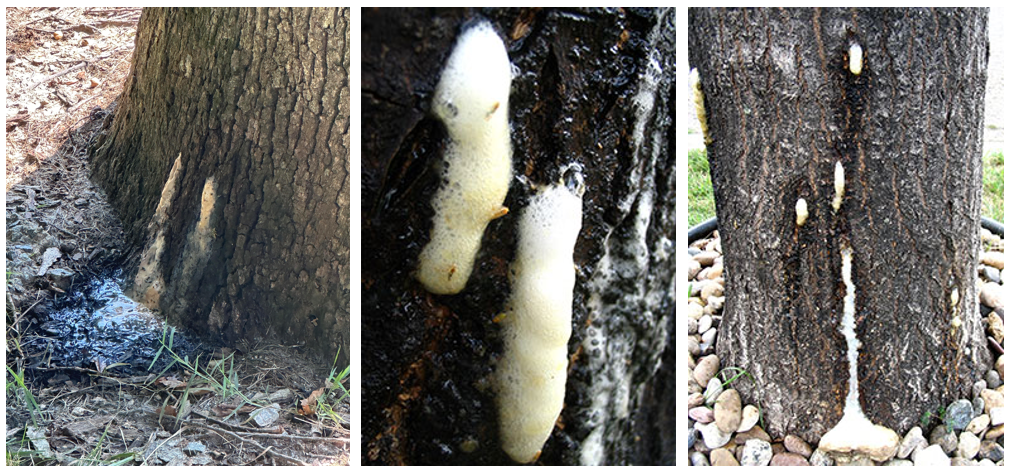
Conditions that typically rule out a tree as a swing host are disease, borer infestation, deep cavities, obvious decay, cracks in the branch unions, bark loss, excessive dead wood, and an overall unhealthy-looking tree. These signs often point to the tree’s structural weaknesses and potential failure in the future.
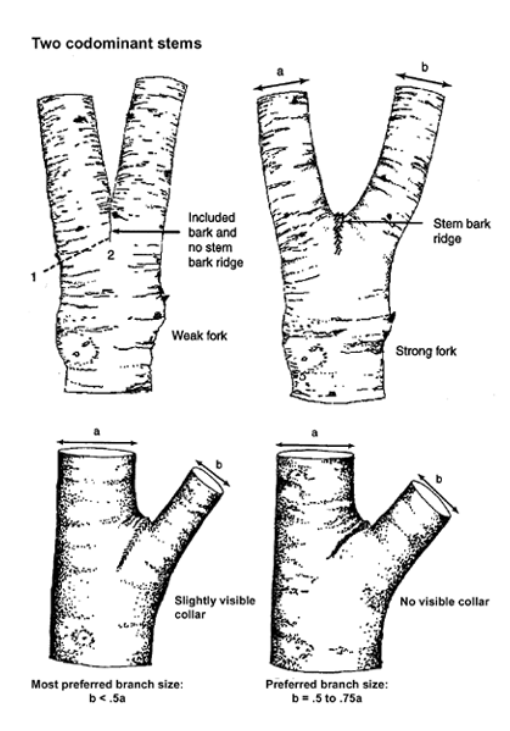
As for branch selection, you want to choose a scaffold branch, one that connects directly to the main trunk of the tree (not just any large branch; size doesn’t always represent strength). The union of the branch should be strong and U-shaped and free from cracks, included bark, and decay, as V-shaped unions and those with damage are far more prone to failure. Branches with lions tailing should also be avoided as the unbalanced foliage mass at the tip creates a lever of sorts and increases the bending stress on the branch.
In short, a large branch (a good rule of thumb here is at least 8 inches in diameter) strongly connected to the trunk of a mature, healthy, hardwood tree makes the perfect candidate to host a tree swing! If you have any questions about your possible host tree, or need help deciding on the best branch, give our office a call and we’d be happy to send one of our Arborists out for a consultation to advise you on the branch best suited for a swing!
*Tree examples that make great hosts: Oaks of any kind, Sycamores, Bald Cypress, Pines, Pecans, Elms, etc!
**the photo below is by the University of Florida, it gives various branch connections, and I thought it'd be helpful in your
selection of the right one**
Will a tree swing hurt my tree ?
Making any amendment to your tree will surely affect it to some degree, but how you apply the swing is what really makes the difference.
We strongly advise against using rope wrapped directly around a tree branch to secure a swing, as this method can injure the branch in two primary ways: constriction(girdling) and abrasion.
If the rope is installed too tightly, or even left in place long enough as the branch continues to grow in diameter, it can begin to girdle the limb. Girdling restricts the movement of water, sugars, and other essential compounds through the branch’s vascular tissues, which can lead to decline, dieback above the attachment point, and, in severe cases, failure of the limb itself. Which can pose a serious danger to you, your loved ones, and your property.
The second issue is friction. A swing is a dynamic load, meaning the rope does not simply rest on the branch; it moves repeatedly under tension. That constant back-and-forth motion acts like a saw against the bark, gradually stripping away the outer protective layer and damaging the cambium just beneath it, which is one of the tree’s living growth tissues. This direct attachment creates concentrated friction and wear at the anchor point, sometimes resulting in severe damage in a relatively short period of heavy use. Once the bark is worn away, the branch becomes far more susceptible to infection, insect attack, decay, and long-term structural weakness.
While wrapping a rope directly around a tree limb may seem like the easiest option, it is also one of the most damaging and potentially dangerous methods of installing a swing. Despite how commonly it is recommended by poorly informed sources, this practice can injure the branch, compromise the tree’s health, and increase the risk of limb failure over time, so it should be avoided entirely.
Another method of tree swing installation that is very commonly recommended by arboricultural professionals and harmful to the health of the branch is a tree sling. In theory, it minimizes friction and spreads out the surface area of the load. But in practice, it still harms the trees' important cambium tissues.
Compression of any kind, whether widened or narrowed, still restricts the flow of essential water and nutrients to the tree and hinders the tree's growth, which causes reaction wood and rot to form on the tension side (or topside of the branch). Which, if left in place too long, can lead to serious structural failure of the limb.
Installing hardware, as outlined in the next section, is the least damaging and invasive means of swing application. Unlike the rope and sling methods discussed above, it does not constrict the cambium, create ongoing surface abrasion, or subject the branch to chronic and repeated injury over time. Instead, when installed correctly, it creates a single localized wound that the tree can compartmentalize and gradually occlude as it continues to grow.
Installing the tree swing:
I worked in collaboration with another one of our ISA Certified Arborists, Shane Krajnik, in this instillation section to lay out the exact process we offer to our customers to give you the ability to attempt to hang a tree swing in the proper and least damaging way on your own for just the cost of the materials (assuming you already have this equipment on hand). If you are uncomfortable with this process, you feel your tree is too high, or simply don’t have the right equipment we’d be happy to install the hardware and chain for you!
The following is a step by step guide of how to install the proper swing hardware, layed out as if our own crew were to do it by ISA Certified Arborist Shane Krajnik:
First, determine if YOU really want to install the swing. Heights are scary, and most trees that can truly support a swing are fairly tall. For instance, where this swing was installed, the lowest limb was over 20 foot high. Tall ladders are expensive, and falls are even more expensive. So please do not follow these directions if you are not 1000% comfortable installing the swing yourself.
Second, now that you have determined you want to install the swing yourself instead of hiring an arborist to climb the tree and do the job while roped in, you need to round up the supplies. Those will be a ladder of suitable height to reach the lowest limb (typically an extension ladder), a semi-powerful CORDLESS drill (be careful you don't want something that will throw you off the ladder if it gets bound up), a Wrench that corresponds to the nut size, Angle Grinder to cut off the extra thread, a 1/2" Wood Auger Drill Bit, for thinner limbs a 1/2" FORGED threaded eye bolt is suitable, but for thicker limbs a 1/2" thick piece of all thread with an "Amon Eye Nut/ Regular Eye Nut" can be used, the corresponding nuts (2 is always recommended as double nutting is the proper procedure), the correct size washer, sometimes 2 can be used if the washers are thin and easy to bend, a galvanized forged swivel, 3x 3/8" stainless quick links, and finally Galvanized 3/8 grade 30 proof chain. We use hardware rated a minimum for 2200lbs, so we recommend only using hardware this grade or stronger.
The following is a list of the materials needed as mentioned in the second step:
1x Ladder
1x Cordless Drill
1x Wrench that corresponds to the nut size
1x Angle Grinder to cut off the extra thread on the Threaded Eye Bolt/ All Thread
1x 1/2" Wood Auger Drill Bit
1x 1/2" Thick Forged Threaded Eye Bolt or All-Thread Rod with a Forged Amon/Regular Eye Nut
2x Nuts that fit the Threaded Eye Bolt/ 3x Nuts that fit the All-Thread Rod
1-2x Washers that are the correct size for the Threaded Rod (depending on thickness)
1x Galvanized Forged Swivel (if using a swing that has the potential to twist/spin such as a tire swing or web swing)
3x 3/8" Stainless Quick Links
However many feet of Galvanized 3/8" Grade 30 Proof Chain that are needed
Third, Figure out if you need to use A Threaded Eye Bolt or All-Thread Rod with an Eye Nut. Unless the limb is wider than 8", then we recommend using the threaded Eye Bolt. If your limb is larger than 8" then All Thread will be needed. Set up the ladder and measure how much chain you will need to purchase by using a rope or string to measure the distance to the ground and subtract by how high off the ground you want the swing to be and another 6 inches to a lot for the hardware length.
Fourth, the actual instillation. Secure the top of the ladder to the limb with a rope to ensure the ladder does not move while doing the dangerous part. Put the drill bit in the drill and drill a vertical hole through the limb (from the bottom). Now insert from the bottom the Threaded Eye Bolt/ All Thread Rod through the hole (the threads should be sticking up to the sky). (if using all thread, put the Amon/Regular Eye Nut on first, then screw it on enough to install a nut, then screw the nut on until 2-3 threads are exposed past the nut, then back the Amon/regular eye nut down to the nut until they are tight against each other (this is the same thing as double nutting (this will remove some of the "free space" within the eye nut, but that’s not important as the swing will always be pulling down))
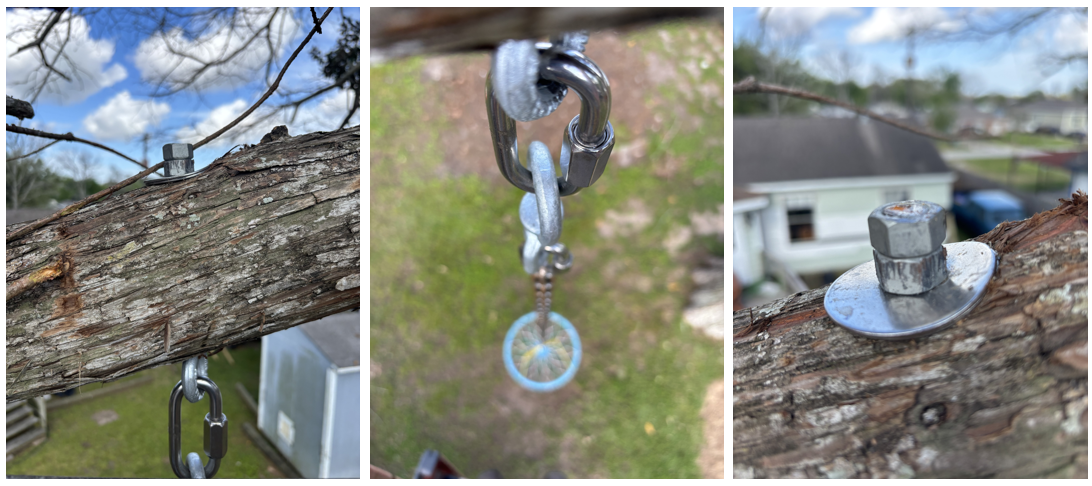
Fifth, once the Threaded Eye Bolt/ All Thread with Eye Nut and Nut are inserted into the drilled hole put the 1-2 washers on the threads until the washers are touching the limb, now put your first nut on and start screwing it down until its compressing the washers against the limb. Keep tightening until you physically cannot tighten the nut anymore (make sure to use hand tools such as wrench or socket and pliers. We don’t want it tightened with electric tools), now install the second nut and tighten until its compressing the first nut (this is called double nutting and stops the nuts from ever backing out). Once both nuts are on, the rest of the threaded rod is no longer important, to avoid any issues with something getting caught on this rod sticking up we advise cutting it flush against the nut to leave a smooth surface free of hangs.
Sixth, now the hard part is done, all you have to do is hang the chain and install the swing now!! You must use one of the Stainless Quick Links to attach the Forged Swivel (if choosing a swing that has the potential to twist around) to the Eye that’s now bolted into the tree. Attach another Quick Link to the other side of the swivel to attach the chain.
So, it goes Threaded Eye Bolt/ All Thread with Eye Nut, then Quick Link, then Swivel(if applicable), then quick link, then chain.
Seventh, now you can remove the rope tying the ladder to the limb, climb down, remove the ladder, and now your chain should be at the height you measured for + 4-6 inches (because of the quick links and swivels). If the chain is too long, cut it to the correct height with the angle grinder as well. We also recommend installing an additional quick link to the end of the chain to make attaching the swing easier (hence why we say 3 quick links)
Attach the tree swing to the quick link and boom! tree swing installed.
DIY tree swing ideas:
Lets face it, tree swings can be a little pricey and there’s a chance you may have exactly what you need to make one lying around your garage right now, and if not, they are far more affordable to make!
The following are step by step DIY Guides for making tree swings that walk you through all of the materials and equipment you need to create your swing, but please DO NOT follow their instillation techniques. Instead, you’d fasten the end of the rope to the quick-connect hardware at the end of the installed chain!
For a traditional tree swing, check out this blog!
https://www.instructables.com/Traditional-Garden-Tree-Swing/
For a fun children’s swing, check out this blog!
https://www.momendeavors.com/simple-diy-tree-swing-2/
For a classic tire swing, check out this blog!
https://www.thespruce.com/how-to-make-a-diy-tire-swing-5211752
For a more complex build using an upcycled pallet, check out this blog that shows you how to build a nice lounging swing made from pallets!
https://needlesandnailsblog.wordpress.com/2015/04/06/diy-pallet-swing-relax-and-enjoy-spring/
Liriope’s Muse - Expert Tree Care Tips